Benefits
• Tones legs and hips
• Strengthens upper back
• Improves spinal flexibility
• Massages organs and regulates their function
• Nourishes spinal discs
Contraindications
• Back muscle spasms
• Herniated discs
• Sciatica
• Positional vertigo
Intro
Intro
One of my first yoga teachers, a wonderful Englishwoman named Penny Nield-Smith, was a real stickler for standing poses; we practiced them endlessly. I would look at yoga books and see pictures of headstands, backbends, arm balances, exotic stuff, but when I went to class it was, you guessed it, more standing poses. She would admonish me for being in such a hurry to stand on my head when, in her view, I couldn’t yet stand on my feet. Her practical guidance helped me realize the value of establishing a strong foundation in a hatha yoga practice–in other words, of being grounded. Yoga evolved from the human urge for self-transcendence, so it’s understandable that practitioners might from time to time indulge in heady dreams of perpetual bliss. Asanas in general, and standing poses in particular, bring us back to earth with a firm reminder that transformation is more than wishful thinking: It is a whole body experience that demands you have your feet firmly on the ground.
Parivrtta Trikonasana (Revolved Triangle Pose) is a great standing pose in which to find your footing because it includes a spinal twist that can uproot you, like a whirlwind, if you aren’t grounded. It’s best to introduce Parivrtta Trikonasana into your practice after you are fairly adept at Tadasana (Mountain Pose), Trikonasana (Triangle Pose), and Parsvottanasana (Side Stretch Pose). Then you will be more likely to experience the potential of Parivrtta Trikonasana to deepen your roots even as it tests them.
Like all spinal twists, Parvritta Trikonasana provides practical benefits beyond grounding. The spine is the anatomical and energetic core of your body. It consists of a column of vertebrae that enables movement and houses the spinal cord, upon which life itself relies. At the very least, an unhealthy spine can make you miserable; at worst, it leaves the entire body susceptible to disease. Twists help maintain a healthy spine by rotating spinal joints in a way that alternately stretches and relaxes the surrounding muscles as well as squeezing the discs, enabling them to absorb nutrients and remain moist. Twists can also massage the organs of your torso to improve their function and integrate vertebral movement along the whole length of the spine. Because many spinal muscles are small and spinal rotation is relatively limited compared to other body movements, forcing any twist is ill advised. An aggressive approach may strain muscles, damage nerves, and stress joints, especially if they are already prone to injury.
Demonstrations
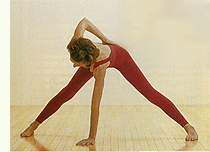
1. Parivrtta Prasarita Padotanasana Prep
Stand with your feet 3-4 feet apart and parallel with each other. As you exhale, bend forward to place your hands on the floor directly under your shoulders. Keep your arms straight and your head at shoulder level. Next, place your right hand on your sacrum and center the left hand under your chest. Don’t round your back to reach the floor: If necessary, use a block under your hands or bend your knees. Keep you hips as level as possible without making them rigid. Press your left hand into the floor and let the upward rebound from that action provide the spinal twist.
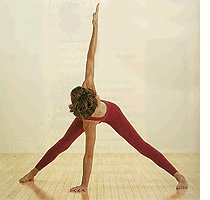
2. Parivrtta Prasarita Padotanasana
Continuing from Exercise #1, exhale to slowly extend the upper arm to vertical. Keep your hips as level as possible to isolate the twist in the upper spine. Relax the muscles around the spine so it rotates as your arms stretch and then turn your head in the direction of the twist. Breathe steadily, making sure each exhalation is complete. When you’re ready, come up and repeat Exercise 1 and 2, this time twisting to your left. on the other side.
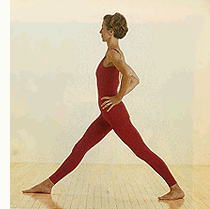
3. Squaring the Hips
Stand with your feet 3-4 feet apart and parallel. Turn your left foot slightly toward the center and turn your right leg out 90 degrees. With your hands on your hips, turn to the right until your hips are side by side. If they are not square, roll your abdomen into our right hip and draw the hip back firmly, taking care to keep your left heel well grounded.
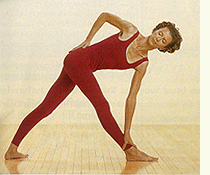
4. Parivrtta Trikonasana Prep
Proceeding from Exercise #3, keep your hips level, lengthen your torso forward over your right leg, and place your left fingers on the floor beside the right big toe. If you can’t place your fingers on the floor while keeping our torso long and your chest open, either bend your right knee slightly or place your hand on your leg or a block. Don’t turn to look up yet; instead, keep your head facing forward. Stay in the pose for several breaths before moving on to the final pose.
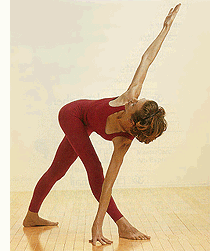
5. Parivrtta Trikonasana
As flexibility in your right hip increases, you may be able to place your left hand on the little toe side of your right foot. As you exhale, extend your right arm up, press the left hand into the floor, and let the arm action and the rhythm of your breath create a clockwise rotation of your spine. Finally, turn your head to the right, feeling how that action deepens the twist along the whole length of the spine. Keep your eyes relaxed and maintain a steady breathing rhythm. Refine the pose for several breaths before returning to standing and repeating the last three exercises on the other side.
Finding Your Ground
Finding Your Ground
Let’s approach Parivrtta Trikonasana from a variation of Tadasana (Mountain Pose), the simple yet powerful asana from which all other standing poses emerge. Stand with your feet wide apart and parallel with each other. Measure the proper distance between your feet by raising your arms to shoulder height and positioning your feet under your wrist or hands. Then place your hands on your hips. If you feel strain in your legs at this distance, bring your feet a bit closer together.
Now look down at your feet. They may be flat or over-arched, pronated or supinated, plagued by bunions, or have toes that claw the mat. You may not like what you see; still, you are looking at your most direct connection to the earth and the ideal place to start re-establishing a grounded state of being.
The words "grounded" and "rooted" have become commonplace to the point of losing their potency. These important terms should be used with respect. As a yoga teacher, when I say "Root your feet" or "Be grounded in your legs," I am asking you to find the sensation of connection to the earth. Gaining a conscious awareness of this experience may take years to develop; now is as good a time as any to start. Lift your toes. Right away you will feel your feet become livelier and stronger. Now separate them just as you would your fingers; you can even simultaneously spread your fingers to guide you to the right sensation. At the same time, try to widen the ball (metatarsal) joints of your feet.
Even if your toes seem stiff, you will probably see and feel that by lifting them you engage the muscles that support the arches of your feet. That’s progress. In fact, if you have flat feet, that’s pretty exciting progress. Healthy arches are quite important, since they form a dome that, just as in architecture, can support enormous weight. In combination with your toes, which act as shock absorbers and keep you nimble, healthy arches put a bounce in your step that resonates through all your joints. If you do suffer from flat feet or weak ankles, consider regularly practicing this simple and therapeutic exercise of lifting and separating the toes. Standing on tiptoe is another good exercise for strengthening your feet.
While your toes are lifted and separated, plant your weight so that it falls evenly on both feet. Then, on each foot, root your weight equally between the ball joint of the big toe, the ball joint of the little toe, and the center of the heel. Distributing your weight in this way helps support the arch and establishes a broad, balanced link to gravity that influences your whole body. To enhance this connection further, imagine roots growing down your legs, out through each of these six points, and deep into the earth. Lay your toes back down, trying to retain the liveliness in your feet, and continue to ground your feet with each exhalation. You may notice a movement rebounding up through your legs, creating buoyancy and a sense of space within your ankles and knees and continuing up to lift the pelvis and the torso.
Releasing the Pelvis
Releasing the Pelvis
Next, turn your attention to the position of your pelvis. The pelvis acts as a hinge between the legs and torso. Holding the weight of the torso in its basin, the pelvis also helps protects the spine by absorbing shock from the legs. If pelvic movement is restricted, you lose that buoyancy, placing stress on your joints and undermining support for your torso. A tight pelvis can also lead to a variety of undesirable compensatory muscle patterns in the upper body.
Tension in the abdominal muscles can exacerbate rigidity in the pelvic region. To counteract this tension, place your hands on your hips, breathe quietly, and allow each exhalation to help relax your abdomen until the interior of the pelvis seems liquid. Then explore the placement of your pelvis by gently rotating it forward, backward, and side to side; imagine the liquid shifting with the each action, like oil in a bowl, until it feels level. With the pelvis in this neutral position, you will be able to stand tall without being rigid. In fact, your pelvis will float lightly and comfortably, rooted in the legs and feet. When your pelvis is free, the spine is far more likely to be pliable and light, especially as your internal strength continues to grow. To add strength in the base of the spine and pelvis, move your tailbone toward the floor as if a weight were attached to the coccyx. This action is subtler than tucking your pelvis; it’s more a letting go than an action. Though the primary sensation is one of release, you will begin to feel a response in the interior of the back pelvis as abdominal muscles engage and stabilize the lower spine. Secure now in a grounded base, your upper body will instinctively begin to let go of chronic holding patterns. You can speed the process along by gently moving the spine, which really is quite pliable. To do this, first spend a minute simply feeling the rhythm of your breath; then deliberately direct that pulse into your spinal muscles. Can you feel the massage? Gradually your spine will feel lighter, as though it is growing from your pelvis like a vine. Grounding your legs and pelvis so your spine can emerge upward with suppleness instead of rigidity is crucial as you begin to explore standing twists.
Testing Your Roots
Testing Your Roots
We’ll begin with a revolved version of Prasarita Padottanasana (Wide-Legged Standing Forward Bend). I’ve already mentioned that standing twists test your roots. Because the spine is attached to the pelvis, any spinal rotation that is restricted or forced can shake your foundation. In this first twist, the pelvis will be symmetrical. This position provides a somewhat simpler relationship between the pelvis and the lumbar spine than do poses that require an asymmetrical pelvic alignment. With a symmetrical pelvis, you can more easily feel the effect of the spinal twist on your roots, gaining insight that will help you guide the twist more directly into the spine and carry over into your practice of less stable standing twists like Parivrtta Trikonasana.
Take a moment to remind yourself of all our preparatory work: active feet, buoyant joints, floating pelvis, grounded tail. Now, standing with legs wide apart, feet parallel, and with your spine light and fluid, inhale as you begin to rotate your pelvis forward and exhale to continue bending forward until you lightly place your hands on the floor. Keep your arms straight with your wrists in line with your shoulders and your head at shoulder level. If your hips are too tight to place your palms on the floor, it’s fine to be on fingertips, bend your knees slightly, or use blocks under your hands.
Now check your roots. Are you still grounded through your legs, or has your weight fallen onto your hands? If so, take a moment to re-establish your foundation by sending movement from the pelvis into your legs and feet. Drop your tailbone to engage the muscles in the inner back pelvis that stabilize and support the lumbar spine. Remember, the movement is not a pelvic tuck; in fact, you should feel as though the whole pelvis is lifting away from your legs even as your coccyx (tailbone) is drawing gently down. Emphasize this downward movement with both your exhalation and the slight pause that follows it. During the pause, consciously release your abdomen; you may feel it spontaneously lift into the front of your sacrum and lumbar spine. Rely upon that strength and support, reinforced by your exhalation, to feed length into your spine so that you feel it grow toward your skull. When your spine grows toward the skull with support at its base, the upper body becomes light and spacious, ripe for the deeper movement of a spinal twist.
Move your left hand to the right, centering it under your torso. Place your right hand on your sacrum, palm down if possible (Figure 1). This hand can give you tangible feedback on the position of your pelvis, helping you keep your hips level. The more level your pelvis, the more the action of the twist will target the spine so it receives the greatest benefit. However, be careful not to make your pelvis rigid; gripping the muscles that tightly can irritate your lower back.
In this position, tune in to the steady rhythm of your breath and the calm environment of your belly. As you exhale, press your left arm and hand into the floor, feeling your torso rebound upward in response. Resist the urge to turn your chest further than it is carried by action of the left arm. While turning the chest is not necessarily wrong, leading with that action can hide and even diminish truly deep movement of the spine.
Observe in yourself any resistance you have to this last instruction. It may not have occurred to you to hang back. After all, when you look at a photo or demonstration of an asana, what you usually see is the maximum expression of the pose. What a photograph cannot reveal is the internal and often lengthy process that took place and guided the pose to full flower. It is understandable that you might simply try to mimic what you see. Instead, go inside, even close your eyes, and let this twist be a discovery. You have already spent some time making your spine consciously pliable and adaptable; now try to feel the emergence of the twist as your spine rotates slightly each time you exhale and press your right arm to the floor.
As you inhale begin to raise your right arm and turn your head to the right. Use your exhalation to fully extend your arm, feeling the rotation deepen (Figure 2). Continue to explore the way your breath’s rhythm resonates through your spine, helping to awaken core sensitivity and movement. With each inhalation, relax away from the edge of your movement, with each exhalation, extend your arms further, letting their action turn the spine. Coordinating breath and movement in this way compels you to slow down and wait for the asana to unfold naturally. As your muscles relax with this breath massage, the spine becomes more adaptable and your arms can extend more strongly, facilitating deeper spinal rotation.
Fine-tune the asana by examining the relationship between your spiraling spine and your pelvis. Ideally, your pelvis is still level. I say ideally because our bodies tend to move following the path of least resistance; in this spinal twist, it’s far easier to rotate to the left by dropping your right hip than to initiate movement from your abdomen and lower spine, where mobility is more limited. Remember, when I say to keep your pelvis level, the right hip at the same height as your left, I don’t intend you to grip your muscles and hold your pelvis rigid, since this can stress your sacrum and lumbar spine. The pelvis continues to float, as you practiced earlier, over a calm belly.
As an exploration, drop your left hip and feel how your spine turns so much more easily to the right. Now, try to keep that turn as you exhale and raise the left hip again. Though lifting the hip will most likely pull you slightly out of that enticing twist, you will feel in the second position that the muscles directly along the spine become more involved–especially in the area of your back that most needs the attention of the massaging breath.
Continue to refine your twist until further visible progress is not possible. Even then, notice the breath’s pulse reverberate through you, a subtle motion that connects you to your core and persuades you to stay in the pose. At a certain point your endurance–and this does require endurance–will begin to wane. Use that as your cue to come out of the pose. On an inhalation, begin to lift out of the pose, relaxing your arms and letting your head and spine melt out of the twist. Lift from the abdomen and use your exhalation to help bring you fully upright.
Repeat these first two positions twisting to your left, and then rest for a minute or two in a passive Uttansana (Standing Forward Bend) before proceeding on toward Parivrtta Trikonasana.
Squaring Your Hips
Squaring Your Hips
Begin as in the previous pose, with your feet about arms’-length apart and parallel with each other. Then turn your left foot and leg and pelvis about 20 degrees to the right. Pivot your right leg and hip so the thigh, knee, and foot turn 90 degrees out from their original position, line your heels up with each other for stability, and place your hands on your hips.
Once you have established your standing position, direct your attention to the left leg. Though you can no longer see the leg, you can feel it. Knowing body movement and position by sensation rather visual confirmation is an essential skill in hatha yoga. As you did earlier, spread the ball joints of the foot, rooting your big and little toe joints as well as the center of the heel. When well grounded you will feel an internal lift flow up your leg, bringing space and inner support to your joints. While you may need to encourage this rebound a bit by lifting the front ankle or knee, the point of any such external action is to facilitate inner movement.
Now that your back leg is grounded, rotate your hips further to the right until they are as close to being side by side as possible (Figure 3). If your hips easily make this rotation, you’re all set. Usually, though, the left hip hangs back. Refrain from turning your hips by rotating your left leg in more. (Doing so will disturb the grounding of the back leg, and keeping the pose rooted is essential: It helps you resist the lure to do the twist from the hips instead of the spine.) Instead, try this method to square your hips: Place your right hand on the right buttock and, with a firm exhalation, move your right hip back, taking care not dislodge the back leg. [You may be surprised to discover that the reason your left hip wouldn’t turn was due to restriction in your right hip]. Moving deeper with your right hip not only opens the hip and moves it back beside the left, it generates a small rotation in the sacrum and squeezes abdominal organs.
Now inhale and again plug your left leg into the earth; exhale to rotate rotate your pelvis forward over the right leg until the torso is parallel to the floor, placing your left fingertips on the floor as close to your right big toe as possible. If you can’t reach the floor, place your hand on your leg or a block or bend your knees slightly (Figure 4). If your hand rests easily on the floor, move it to the little toe side of the foot.
Take a minute to stabilize your base. By this point you have probably realized that Parivrtta Trikonasana is not just a twist but also a balancing pose, which makes it even more necessary to think about your roots. The more grounded your left leg is the lighter, more spacious, and more mobile your right hip will be, making it much easier to find inner symmetry and avoid uncomfortable pressure in your right hip. At the same time, keep the inner environment of your pelvis fluid and steady by focusing on the rhythm of your breath, letting the exhalation and the pause that follows it create internal support for the sacrum and lumbar spine. Recall the sensations of the symmetrical pelvis you experienced in the Parivrtta Prasarita Padotanasana. Imagine that you have a second pair of legs positioned as they were in that pose; let these imaginary legs stabilize your pose.
With the pelvis level but not rigid, exhale and lengthen your spine from the tailbone to the skull. Allow the pulse of your breathing to make tangible and magnify subtle sensations throughout your body, revealing and then softening any areas that seem hard. Exhale to extend through your left arm and press your left hand into the floor, feeling your torso rebound up in response and the spine begin to rotate to the right. As in Parivrtta Prasarita Padotanasana, resist the urge to turn your chest further than it is naturally carried by the arm’s action.
Continue to scan the spine for any signs of tension that could irritate tender ligaments, letting your breath help release the tight spots. As your spinal muscles soften, exhale and extend the right arm upward, allowing this action rotate your spine even more. Be patient and move with the pumping rhythm of the breath. Retreat slightly as you inhale; extend the arms to rotate the spine more as you exhale. Stay strongly connected to your roots by initiating each spinal response from the back belly and by gently keeping your hips level. If at any time your breathing becomes strained, back off until a steady rhythm is restored.
Finally, rotate your head to the right (Figure 5), feeling the enormous influence of this action. Turning your skull sends rotation spiraling down the spine. If your neck hurts as you turn the head, try imagining you are initiating the turn from within you chest. If your balance is disturbed, look back down as you re-root your left leg, steady the pelvis, and calm the belly. Stay focused on your base as you exhale and slowly turn your head again. Persist in working with the head movement; if you don’t turn your head, rotation is reduced not just in the cervical spine but also in the thoracic region, depriving you of the chance to restore movement in this notoriously tight area of the spine.
Stay in Parivrtta Trikonasana for a few breaths. Try closing your eyes to better sense the subtle motion that free breathing sustains even when the outer form of the asana appears static. Let this internal motion help you become ever more comfortable. Identify and release any nagging pockets of holding along the spine until your chest blooms fully from the inside out. Rely on subtle internal movements and your breath as the guides that will tell you when the time has come to leave the pose. As the ability of the structural muscles to support your asana weakens, you will feel strain in your breathing. At that point, inhale and relax your arms, letting the spine uncoil, then exhale and draw your torso up to a standing position, initiating the movement from your pelvic floor. Repeat the last three posture of this practice sequence on the other side (twisting to the left) and then rest in Uttansana.
Not long ago I overheard another yoga teacher scoff at those of us who teach "as though yoga can change the world". Your time spent on the mat may not obviously change the whole world, but it sure can change you. When your asanas are grounded in a solid base, you develop a sense of well-being that endures. Being grounded instills patience and makes you strong. Being grounded keeps you in the here and now. Gandhi once advised that we "become the change we want to see." If you take these fine qualities from your asana practice and apply them in skillful living, you’re taking a step toward doing just that. And, perhaps, toward changing the world.
Barbara Benagh has been practicing yoga since 1974. She is grateful to her first teacher, Elizabeth Keeble of Birmingham, England, for igniting her passion for yoga. Barbara teaches seminars throughout the United States and has a particular fondness for her school, The Yoga Studio, in Boston, and for the devoted students there.