Crick Fixes
Tension can be a pain in the neck. Master these gentle moves to create lasting ease.
By Barbara Benagh
Benefits
• Increase spine and shoulder flexibility
• Strengthens and invigorates the whole body
• Improves respiration
• Builds confidence
• Develops humility
Contraindications
• Spinal nerve damage and disc problems
• Chronic shoulder dislocations
• Pregnancy
• Unmanaged high blood pressure
• Retina problems
Intro
Intro
By the time Tatiana Makoukhina came to my workshop last spring on easing tension in the neck, shoulders, and upper back, she'd been suffering from chronic pain for more than a decade. In the early '90s, as a single mom newly arrived from Russia, Tatiana worried constantly about whether she could make a new life in America with her daughter. She put in long hours as a hotel cleaner—the only job she could find—and felt she could never relax, never stop working and planning. Her back and neck were constantly rigid with tension, she suffered severe migraines, and then she herniated a disk in her lower back lifting a heavy mattress.
Despite her persistent discomfort, Tatiana worked hard to manage her pain and improve her health. Athletic in her childhood—she had loved gymnastics, volleyball, and dancing—she began running and exercising again. Surgery for her disk injury helped with her lower back pain, and her migraines eased once she began practicing yoga regularly in 2002. Still, nothing seemed to banish the tightness, aches, and occasional stabbing pain in her shoulders and neck.
Tatiana certainly isn't unique: We all live in a world filled with anxiety. We race through hectic days and fall into bed exhausted; we fret over our bills, our kids, our jobs and the state of the planet, too. It doesn't help that many of us have lives skewed toward the sedentary, with too many hours spent hunkered down behind a computer or steering wheel. Our stress often winds up stored in clenched necks, shoulders, and backs-which eventually weakens our muscles, strains our joints, and limits our range of motion. The tension hangs heavy on our necks and shoulders, as unwelcome as a winter coat on a summer day.
It doesn't have to be this way, of course. The shoulder girdle is designed so your arms, neck, and shoulders can move freely and easily. Even if you have a history of injuries or have suffered from chronic tension for years, the approach I've developed can help you learn to soften your neck and shoulder muscles and restore ease and freedom.
When I ran into Tatiana a few weeks after the workshop, she was thrilled with her progress. Not only had the workshop taken away her pain but, even better, she'd been able to stay pain-free by including 5 to 10 minutes of my exercises in her daily hour of yoga. Her back, shoulders, and neck were feeling more relaxed than she'd ever imagined possible.
Demonstrations

1. Neck Blanket Stretch
Roll a blanket into a firm, even cylinder large enough to wedge between the base of your skull and the tops of your shoulder blades. Lie back over the roll so it gently stretches your neck; the roll should wedge just under the occipital ridge at the back of your skull and support your neck and your first few upper back vertebrae. Keeping your knees bent, place both palms on your forehead, fingers pointing toward the crown of your head, and bring your elbows close to each other. Close your eyes and tune in to your breath, feeling how its rhythm creates subtle movement. Notice areas in your neck, shoulders, and upper back that seem dense, dull, and resistant to the breath's wavelike action, and invite them to relax against the blanket roll. As your muscles begin to release, slide your shoulder blades away from your skull; you may want to repeat this movement several times as your muscles continue to relax. Remain on the roll for up to five minutes, then remove it and continue to lie on your back for a few breaths, tuning in to the sensations in your neck, shoulders, and upper back.

2. Arm-under-Back Stretch
Lie on your back with your knees bent and feet on the floor; you can use the neck roll or let your head rest on the floor. Slide your right arm, palm .down, under your lower back so the fingertips are visible on your left side. (If you feel pain or tingling in your right shoulder, don't slide the hand so far to the left.) This position helps release tension that rounds your shoulders and binds your upper arm and shoulder girdle to your rib cage. At first, just relax; let the movement of your breath in the right side of your upper chest begin to create release in your shoulder muscles. As your shoulder relaxes, experiment with sliding the shoulder blade up and down your back, co-ordinating the movement with your breath; you can increase the stretch by drawing the shoulder blade down your back and gently pressing it into the floor. Hold for up to 5 minutes, then repeat on the other side.
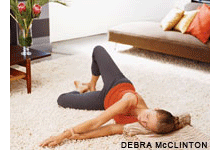
3. Arm-Across-Chest Stretch
Lie on your left side with your knees bent, resting your head on the blanket roll. With your left upper arm and elbow on the floor at shoulder level, grasp your right wrist with your left hand. Keep your right arm straight and your right shoulder relaxed. Exhaling, use your left hand to pull your right arm across your chest until you feel resistance around your right shoulder. Pause there, maintaining traction and relaxing the right shoulder until the resistance ebbs; then increase the pull of your left hand on your right arm. (This action may roll your chest closer to the floor.) Let your right collarbone and right shoulder blade glide freely, as though each were separated from the ribs by a tiny air pocket. When you're ready to move deeper, create a counterspin by rolling your belly to the right, bringing your right knee up toward the ceiling and placing your foot on the floor. For more stretch, bring your left knee up as well and place your left foot on the floor. Hold for three minutes, then release, slowly extending your right arm to the right at shoulder level. Repeat on the other side.
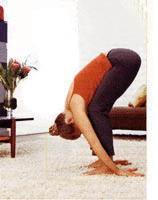
4. Standing Child's Pose
Stand with your feet hip .width apart and parallel. Bend your knees enough so you can hinge forward at your hips and rest your torso on your thighs. Let your collarbones and shoulder blades slide over the ribs, much as in the Arm .Across .Chest Stretch. Relax the muscles along your spine too, and wait patiently for them to release. When you roll up to an upright position, you should feel both lighter and more grounded.

5. Easy Neck Release
Stand in a strong but soft Tadasana (Mountain Pose), feet hip .width apart. Ground firmly into all four corners of each foot, and create length in your spine, gently drawing your tailbone toward the floor and the top of your head toward the ceiling. Maintaining that sense of length, reach overhead with your left hand and hold under your right ear at the notch just behind your jaw; as your head tilts slightly to the left, make sure you don't tip it back and jut your chin toward the ceiling. Rest your right hand on your right shoulder, fingers pointing toward your neck. Take full, deep, but unforced breaths for a minute, letting your muscles relax and expand into that gentle rise and fall. Then deepen the stretch by gently pulling your head to the left and your right shoulder down, away from the ear. Pull right up to the edge of discomfort, then pause and relax into the stretch for another minute before repeating on the other side.
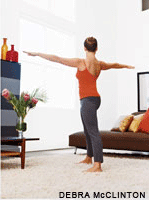
6. Heart like a Wheel
This exercise helps you learn to twist without creating unnecessary tension in your upper back, shoulders, or neck. Stand with your feet about four feet apart and parallel, and your arms stretched out to the sides at shoulder height. Let your breath create a sense of spaciousness in your chest. Then, keeping your pelvis squared to the front, rotate your upper spine to the right. Imagine your heart as the hub of a wheel with spokes extending from it through your shoulder blades, collarbones, and arms. Keep your right arm in line with the plane of the rotation of your shoulders; if you move the arm farther around, you'll compress the shoulder joint. Allow your breath to create freedom, melting the tension that binds the shoulder girdle to the rib cage so you can turn farther, and softening any tension that arises in your lower back. Hold for 15 to 20 breaths. Repeat to the left.
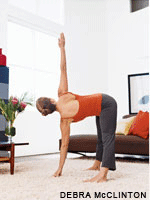
7. Revolved Wide Legged Standing Forward Bend
Stand with your feet about four feet apart and parallel. Let your smooth, full breathing create length in your spine. Maintaining that length, breathe out to hinge forward from your hips until your torso is roughly parallel to the floor. Place your left fingertips on the floor (or on a block) in line with the shoulder, elbow straight, and place your right hand on your sacrum. Keeping your hips level, press down through your left arm and feel how that creates a rebounding movement that lifts your chest. Pull your right shoulder back to awaken the muscles around your collarbones, shoulder blades, and upper back; then rotate your upper spine and shoulders to your right, just as you did in Heart like a Wheel, and reach your right arm up in line with the plane of your shoulders. Hold for 10 to 15 breaths, then bring both hands to your hips and release your torso toward the floor for a few breaths before doing the second side.
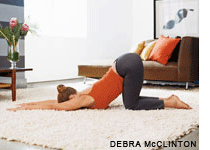
8. Kneeling Dog
This exercise helps you backbend without creating excess tension in your upper back. Come onto all fours, hips directly over your knees, and hands directly under your shoulders. Then, still keeping your hips over your knees, walk your hands forward, bringing your chest closer and closer to the floor. Extend strongly from your belly through your ribs and underarms and out through your fingertips. (If you can't straighten your arms fully with your hands shoulder .width apart, separate them until you can.) Keeping your arms active, release tension from the muscles around your upper spine and ease closer to the floor. Rest your forehead on the floor or, if you're very flexible, gently arch your neck and bring your chin to the floor. Hold this position for 10 to 15 breaths.
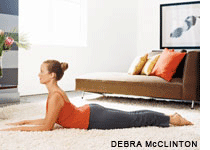
9. Sphinx Pose
To transition into Sphinx from Kneeling Dog, press your palms firmly into the floor. Round your back toward the ceiling, shift your weight forward, and let your pelvis move forward and to the floor, again creating an arched spine as your elbows come to the floor and you arrive in Sphinx. To support your lower back, reach back strongly through your feet and press them down, draw your tailbone toward the floor, and gently lift your lower abdomen toward your spine. Plant your hands and forearms firmly, lengthen the backs of your arms from your shoulders to your elbows and, without moving your elbows, imagine dragging them back toward your torso. Let each exhalation carry a wave of release down your upper spine; this action allows you to create more space between your ribs and to lift the side and top of your rib cage and your collarbones without creating tension in your throat. Hold for 8 to 10 breaths.
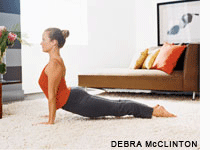
10. Upward-Facing Dog Pose
Lift into Cobra Pose. Then turn your toes under, use them to push forward, and imagine your heart being pulled forward as you push down through the back of your arms, draw your shoulders back, sweep your side ribs up between your arms, roll onto the tops of your feet, and lift your knees off the floor. Rather than rounding forward and gripping your shoulders and upper back and letting the pose hang from them, feel your heart lift you into the pose from the support of the bottom tips of your shoulder blades. Finally, draw your head back, keeping the back of your neck long and initiating the movement of your head from the lift of your shoulder blades and heart. If taking your head back hurts your neck or makes you round your shoulders, keep it upright. To come out of the pose, lift your hips and sit back onto your heels in Balasana (Child's Pose), chest on your thighs and head on the ground.
Do by Undoing
Do by Undoing
I developed my approach to relieving neck and shoulder tension the hard way. At 17, I was a passenger in a dramatic car wreck. My sister had cajoled and pleaded until I agreed to go on a double date with a boy I had absolutely no interest in. So I was pouting when I got in the car, and my date responded by speeding down the gravel road and missing a curve. I was thrown out of the car and vividly remember clinging to the Volkswagen's window frame as we flipped through the air. Fortunately, I lost my grip on the car and a bush broke my fall.
I recovered from the concussion, lacerations, and broken bones within a few months, but I ended up with a shortened left collarbone. Over time, that structural imbalance pulled my left shoulder forward, compressing my neck and eventually causing two of my neck vertebrae to fuse.
In my early 20s I began studying yoga, hoping to regain some of the fitness I'd enjoyed before my accident. I loved yoga immediately, but as my expertise grew and I progressed toward more demanding poses, my neck and shoulder problems restricted me and made me vulnerable to injury. My teachers noticed my imbalances, and with their help my alignment improved. But I still got hurt frequently, and much of the time my neck and upper back muscles were tense, achy, and tired.
I soon realized that my chronically tight muscles felt at their best right after a massage—relaxed and free of their accustomed tension. I began to think that if massage could release my patterns of chronic contraction, I should be able to find a way to practice yoga that could give me the same relief.
Fortunately, my search quickly led me to Angela Farmer, a teacher whose approach to yoga was much more internally focused, intuitive, and patient than what I'd been taught. I came to think of her style as "the undoing process"—"undoing" not just because it undid tension, but also because it focused less on actively changing your body than on establishing a compassionate dialogue with it, inviting health and ease into it and then watching, waiting, and allowing change to come.
Savoring how light and calm I felt after this kind of practice, I decided to experiment with ways to refine the undoing process. I discovered that long holds of passive reclining poses, often with blankets, bolsters, or other props, were key to releasing my tension. As I learned to relax in these poses, I began making the exercises more active, using muscular action to increase traction on one stiff area while maintaining an overall focus on release and relaxation. Finally, I worked to integrate these feelings of freedom and ease into my whole yoga practice; in every pose, I focused on practicing with the least tension and effort and the greatest comfort possible. This three-step approach is the core of my program for releasing tension in the neck, shoulders, and upper back.
Learn to Let Go
Learn to Let Go
Passive relaxation exercises are the core of my program. Just about anyone can benefit from them, even those who've never done a single asana. These poses give you a taste of ease and comfort, a touchstone experience you can refer to again and again as you progress into more active exercises and challenging yoga poses.
Relaxing deeply is a sanctuary, yet few of us allow ourselves to enter it. It feels so good that you'd think it would come easily, but many of us are so accustomed to tension that we have to relearn the natural process of letting go.
The first step is simply lying down on your back on a firm, comfortable surface and letting yourself rest. Almost certainly, you'll feel your muscles naturally releasing tension because they no longer have to work to hold you upright. You may notice you spontaneously let out a sigh of relief.
To relax more deeply, though, you have to consciously build on these natural responses. The secret to doing this is to focus on the movement of the breath in your body, using it to uncover and melt away tension.
Begin by tuning in to your breath. Pick up its rhythm, letting your muscles relax into and move with its gentle rise and fall. Throughout your practice, let this rhythm hold your attention. Feel how your breath creates an effortless expansion and contraction. Also notice any places in your body that seem tense or immobile or unresponsive to the ebb and flow of your breathing. To help them release, imagine saturating these tight, dull areas with the easy rhythm of your breath; if that doesn't work, imagine your breath originating deep within your tense places.
Bringing your attention to your contracted spots will probably help them release. But if you're like most people, you'll also discover tension that's stubbornly resistant to letting go. When that happens, remember to be patient and curious.
Chronically clenched muscles can feel tender, sore, rock hard, numb—or some combination of these sensations. Let your awareness drop deeper and deeper into each tight area, getting to know its specific character. With your breath, ask your muscles to slowly shift from tension to release, from density to expansion, from hard to soft.
Once you've experimented with this undoing process, apply it in some simple reclining positions like the Neck Blanket Stretch and the Arm-under-Back Stretch. These positions use body weight, position, and basic props to create gentle traction on classic neck and shoulder hot spots.
As you explore these passive exercises, don't expect your tensions to melt away instantly. To undo your chronic patterns of holding, you have to learn to focus completely on letting go, and that takes time. Your undoing skills will mature with practice. The more often and more deeply you relax, the deeper your breath will penetrate, and the more subtle your awareness will become.
By starting the undoing process, you've begun a conversation with the residue your past has left behind in your body. Not only can the process lead you to much greater comfort, but it can also be profoundly contemplative and rich with insight. As you relax, you may discover emotions and memories that seem to have been locked within your tension. Years after my accident, I uncovered a surprising amount of anger at my sister for pushing me to go on that fateful date. The undoing process has led me to unexpected stores of positive feelings, too; when I began to practice again after a nearly fatal asthma attack, I found myself flooded with joy and gratitude.
As you continue to release chronic muscular holding, you'll sense that contraction creates subtle vibrations of mental unease, and as these dissipate, you'll discover that easing tension from your neck and shoulders calms your mind, too.
Tame Tension with Traction
Tame Tension with Traction
Just as I did at first, you need to give yourself plenty of time to become familiar with the undoing process in the simple passive poses. Then begin to explore the more active exercises I call Arm-Across-Chest Stretch, Standing Child's Pose, and Easy Neck Release. In these exercises, you use a little muscular energy to create a bit more traction than you can achieve in the passive poses. But you should infuse these exercises with the same intention that informs the passive ones: Undo tension by finding fluid movement guided by your breath.
In these more active exercises, challenge your concentration by stretching right to the edge of discomfort and then use your undoing skills to release your muscles' resistance. Move slowly and gently, giving your muscles time to assimilate the stretch. If you work too hard or move too quickly, you can create more contraction or strain your muscles. But if you're patient and let yourself be guided by your breath, you can usually trust your intuition about how intense a stretch you can handle.
All three of these poses help you learn to separate and isolate the movements of your head, neck, shoulders, arms, and ribs instead of moving them as one stiff unit. In each exercise, explore how your exhalations can ease away your tension. Every few breaths, you may feel an urge to make a small adjustment in your position to create greater ease, expansion, and vitality. Be sure to make these changes consciously and slowly. This gentle, mindful work will prepare you for continuing to release tension even as you move into increasingly challenging asanas.
Work Hard, Stay Soft
Work Hard, Stay Soft
When I began exploring the undoing process, I found that upper body tension usually sneaked back into my practice as soon as I attempted a complex or difficult asana. I'm sure you know what I'm talking about. When we try challenging poses, we often engage not only the muscles that need to work hard, but also others that don't contribute to the pose at all. If you struggle to lift into an arm balance like Bakasana (Crane Pose), you may find yourself tightening your throat and grunting and straining. If backbends challenge you, it's easy to end up hunching your shoulders and compressing your neck. But engaging muscles that don't need to work never helps a pose. The excess tension only tires you, stifles the free flow of breath and energy, and makes you more vulnerable to injury.
Yet paradoxically, poses in which it's difficult to maintain ease in your upper torso muscles—twists and backbends, for example—can be the ones that eventually bring the most openness and freedom to your neck, shoulders, and upper back. The secret to making these poses your allies is the same mindful approach you used in the passive and mildly active poses: Move slowly and patiently, making the fluid rhythm of your breath your focus and relying on your awareness of sensation to recognize and undo the excess tension. Twists like Parivrtta Prasarita Padottanasana (Revolved Wide-Legged Standing Forward Bend) and Heart like a Wheel and backbends like Kneeling Dog, Sphinx Pose, Bhujangasana (Cobra Pose), and Urdhva Mukha Svanasana (Upward-Facing Dog Pose) require strong muscle action in your upper torso, so you need to keep softness in your muscles even as they work hard. Softness isn't weakness; if your muscles are hard, you're sacrificing the subtle breath-driven movement that helps you distinguish between strong engagement and strain. Your active muscles need to be soft enough to allow these movements as well as the subtle ripples that reverberate through you as other muscles release.
As you explore more active poses, allow the large peripheral muscles to soften enough that you feel your support coming from deeper within. Imagine that you're a flower being opened by your breath. Staying in touch with your breath's inner rhythm lets sensation guide you to areas that are stuck or in pain. When you find such a place, modify the outer form of your pose so you can focus on its inner essence. If your shoulder feels contorted and contracted when you try to reach for the sky in a standing pose like Parivrtta Prasarita, for instance, rest your hand on your hip instead. If your neck hurts when you try to turn your head, let your head hang a bit, experimenting with different positions until you find one that allows you to release the pain and tension. You can slowly work your way toward the full expression of any pose if you're patient and grant the same value to the inner expansiveness of a pose—from which comfort is born—that you give the pose's outer structure.
Practicing with this inner focus can make painful neck, shoulder, and upper back tension a thing of the past. Tightness in your upper body may return from time to time—with my shortened left collarbone and fused vertebrae, I'm still prone to it—but with these tools you can loosen it before it becomes debilitating.
Moreover, the undoing process can transform your yoga. After this kind of practice, you'll not only feel as though you've gotten great exercise, but also as though you've had a good massage. Using this approach, you can move toward any pose in a way that leaves you feeling relaxed, light, energized, and radiant.
Barbara Benagh has been practicing yoga since 1974. She is grateful to her first teacher, Elizabeth Keeble of Birmingham, England, for igniting her passion for yoga. Barbara teaches seminars throughout the United States and has a particular fondness for her school, The Yoga Studio, in Boston, and for the devoted students there.