Benefits
• Increase spine and shoulder flexibility
• Strengthens and invigorates the whole body
• Improves respiration
• Builds confidence
• Develops humility
Contraindications
• Spinal nerve damage and disc problems
• Chronic shoulder dislocations
• Pregnancy
• Unmanaged high blood pressure
• Retina problems
Intro
Introduction
I fall into my yoga practice with relish akin to getting into bed at the end of a long day. Many people start their practice with a series of asanas such as Surya Namaskar (Sun Salutation) to warm the body up, but I usually start by lying over a bolster that I've placed under my back.
At first glance lying down on a bolster may seem like a strange way to prepare for active asanas. Bolsters are more commonly used as preparations in restorative practices or, occasionally, to prepare for backbends. But work with bolster has deeper gifts to give.
I discovered these gifts some years ago when I went through a long series of discouraging injuries. For several months, my yoga practice consisted entirely of lying over restorative bolsters. I especially like using a bolster to support a fairly deep backbend. To my delight, this position enforced an introspection that revealed sensations and feelings I had never experienced in all my years of yoga. More than ever before,I found myself aware of my breath and of how its rhythm created subtle internal currents previously concealed beneath the familiar effort of the asanas.
Over time, this inner focus helped me to overcome my injuries. But as the flowing internal movement worked its way to the surface and I returned to more active asanas, I was determined to maintain my newfound internal awareness. Years later, I still rely on bolster work to set the tone for my practice and to help me understand challenging asanas.
Demonstrations

1. Bolstered Backbend Roll
1 or 2 blankets into a firm cylinder. Lie back on this roll so that it supports your middle and lower back (from the lower tips of the shoulder blades down). Your hips and head will rest on the floor. If your lower back or neck are uncomfortable, reposition the bolster and/or place another, smaller bolster under your shoulders and neck. Relax your arms at your sides.

2. Backbend Over a Crate
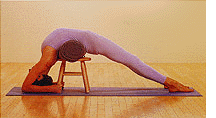
Roll two blankets into a firm cylinder and place them on top of a sturdy crate or stool. Lie back over the bolster, positioning it in the small of your back. With your hips and shoulders at the same level, melt back over the bolster until your spine relaxes. To extend further, stretch your arms overhead or bend your elbows and grasp the crate or stool. Relax your neck, and roll your top shoulderblades toward the stool to open your chest more. Extend your legs and place your feet flat on the floor. Focus on steady breathing to enhance an internal focus.

3. Setu Bandha Sarvangasana
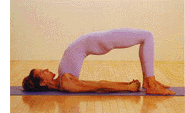
Lie on your back with your feet flat on the floor, slightly wider than hip-width apart, and your heels positioned directly under your knees. With a steady exhalation, extend your calves and the backs of your thighs to raise your hips and lift onto your shoulders. Join your hands under your back and straighten your arms onto the floor. Roll your top shoulderblades toward your tailbone to open your chest and lift the spine. Extend your calves to plant the heels and lightly tuck your tailbone to raise your hips.

4. Urdhva Dhanurasana
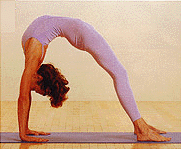
Lift again into Setu Bandha Sarvangasana. Reposition your arms by placing your palms on the floor with your fingertips pointing toward your shoulders; keep your elbows shoulder-width apart. With a steady exhalation, extend the backs of your thighs and calves to pull the shoulders and head off the floor. Simultaneously, roll your top shoulderblades toward your tailbone and straighten your arms. Continuing to breathe steadily, lift your top ribs away from your arms. Position your arms and lower legs as perpendicular to the floor as possible. [Two versions here: A. if we have two additional illustrations B. the more probable single illustration of dwi pada]

5. Half-Way to Dwi Pada Viparita Dandasana
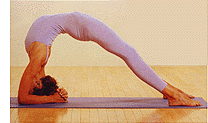
From Urdhva Dhanurasana, bend your elbows and place the crown of your head on the floor. Extend the backs of your legs to keep your hips raised and spine lifted. Open your chest and rotate your top shoulderblades toward your tailbone. Keeping one hand firmly planted on the floor, slide the other arm past your head and cup the back of your head in your hand. Repeat this action with the other arm and join your hands behind your head.
Bolstering Your Practice
Bolstering Your Practice
To practice this supported backbend, you'll need a bolster. There are a number of prefabricated bolsters you can buy, but I prefer to use blankets because they are adaptable. You will need to experiment a bit to find the right bolster for you and the best way to use it.
If your back is stiff, start modestly by rolling a single blanket into a firm cylinder. If you are more experienced or flexible try a bolster rolled from two blankets. Sit on the floor in front of the bolster and lie back over it, positioning it under your middle and lower back (from the lower tips of your shoulderblades down). It will support your ribs and, if you use the larger bolster, perhaps your waist as well. Relax your legs and melt backward over the bolster, lowering your upper shoulders and resting your head on the floor. Relax your arms on the floor at about the level of your shoulders (Figure 1).
As you begin, your body will probably grab your attention first. Your sensations may range from complete ease to significant discomfort. You are seeking an experience that is difficult enough to make you aware of places where you are tight but which allows you to coax those tense areas into the state of alert relaxation that is essential in a hatha yoga practice.
If your lower back is painful, your breathing strained, your neck crunched, or your head doesn't reach the floor, your position needs to be modified. Reposition the bolster by moving it slightly higher or lower. If that adjustment doesn't help, place a smaller blanket roll under your shoulders and neck or reduce the size of your roll. If your back totally rebels, remove the bolster and consider trying it again later in your practice. When you first try this approach, you may find it easier to warm up by practicing more active asanas first, since releasing while on a bolster demands a particular kind of attention that takes time to develop. I actually put beginners over a single bolster only at the end of class; as their skills increase, we use it earlier. Of course, if you already find this position easy, you can increase the size of your bolster.
Once you have found a position that feels right, challenging but not too uncomfortable, begin to turn your attention inward. Though you have already made some adjustments to become more comfortable, the sheer physical challenge of adapting to this unfamiliar position may still overshadow the more subtle, inner landscape of the pose. Now your real work begins as you seek a way to dive beneath the strong sensations on the surface to an inner place where there is room for you to breathe smoothly and be both mentally and physically calm. The support of your bolster may allow you to create more ease and spaciousness than can when you have to support all your weight with your muscles.
As you lie on the bolster, respond to areas that feel tight or uncomfortable by trying to stretch and move them. Use your hands to gently pull your head and lengthen your neck. To lengthen the lower back, tuck your tailbone and slide your hips further away from the bolster. Enhance your fine tuning by turning your attention to your breathing. Initially, your breath may reflect the discomfort in your body by being slightly ragged. Consciously slow it down and slightly extend each exhalation. As your breathing grows steady, notice how it develops a rhythm that expands beyond the chest to resonate through your whole body. Coaxing that pulse into your tightest areas is your goal.
Facing the Challenge
Facing the Challenge
In his groundbreaking book Bodymind (G.P. Putnam's Sons, 1986) Ken Dychtwald observed that when confronted with struggle humans either shrink from it or expand toward it. As you lie over the bolster try to feel which of these roads you are traveling. Initially, you may reflexively tighten in reaction to the strong back arch created by the bolster. However, it is critical that you consciously soften and make more room inside your body. Continue to modify your position (even reshape your bolster if necessary) until you are at your ìedgeîóthat place where you feel yourself physically challenged but still able to maintain a steady breathing rhythm.
Though you are letting go, your body should not collapse. Just flopping is not letting go. In fact, undoing resistance should be a highly conscious process with distinct and tangible sensations. Tension must be confronted [acknowledged? does confronted seem a little aggressive? I'm wishy-washy about this], dissolved, and finally recycled into true expansion. As your surface grows quiet, become acquainted with the inner movement that pulsates through your body on the beat of each breath. Observe this "undoing" process closely: You are learning to recognize resistance and transform it into renewal, a skill that will mature until it can support even the most challenging asanas.
When you feel ready to take on more challenge, cup your hands behind your head in and bring your elbows in so they are shoulder width apart. Pause for a moment to feel how broad your upper back becomes when you do this, and then, as you exhale, slowly begin to spread your elbows wider without narrowing your upper back. This will open your chest and thoracic spine even more. Keep your elbows wide for a few breaths before relaxing yours arms out at your sides and on to the floor at shoulder level.
Letting yourself completely fall back into the bolster, close your eyes and allow the rhythm of your breathing to draw you inward. Depending on how comfortable and absorbed you are, the time you spend here may vary from several minutes to half an hour or more. At the end, in your clean slate of a body, you will be ready for the renewal that comes from practicing asanas.
When you are ready to leave the bolster, put your feet flat on the floor. Removing any props you've placed under your neck, lift your hips and slowly push yourself over the bolster onto your shoulders. Move the bolster under your hips, and hug your knees into your chest for a minute or so. You may feel mild discomfort in your lower back that should subside quickly, to be replaced by heat that spreads throughout your back.
You are now ready to progress to a more active yoga practice informed by the skills you have developed over the bolsteróa practice more likely to find the balance of physical action, internal focus, and conscious breathing that form the core of hatha yoga. Your time spent over the bolster can help your asanas reach the ideal described in Patanjali's Yoga Sutra :ìalert without tension and relaxed without dullnessî (translation by T.K.V. Desikachar, from The Heart of Yoga (Inner Traditions, 1995).
From Bolster to Backbends
From Bolster to Backbends
If you know your practice will include backbends, you can postpone your bolster work until you have come to the point where backbends loom. If you find the bolster work already described easy, consider adding this even deeper version. It is wonderful at the beginning of your practice but is especially effective when preparing for backbending.
Place a double blanket roll on top of a stool or milk crate. Sit on the bolster and slide your hips down just enough that you can lie back and position the bolster in the small of your back. Lie back, letting your back melt into the bolster, and allowing your arms, legs, and head to hang. Try to position yourself so your shoulders and hips are at about the same level. It is possible that you may be tall enough or flexible enough that your head reaches the floor. In that case, try folding one or two blankets between the crate and bolster for more height.
Hanging in this position may not be easy at first because your spine must be flexible enough to tolerate the weight of your passive hips and shoulders. You may reduce any strain by placing a block under your head and resting your hands on your chestóor you may even have to bail out for now. Don't be discouraged. This doesn't mean you won't ever go further, only that there is enough of an obstacle that you must temporarily retreat. The work on the lower bolster is plenty of challenge, and will eventually prepare you to go deeper.
If this position is within your capacity, take several minutes to relax into the pose just as you did with the lower bolster. Letting yourself trust the support of the bolster, slow your breath and extend your exhalation as you adjust and ease your spine into a deep, even, comfortable archóa prelude to the malleable spine that is desirable in all backbends. You can deepen the arching action further by either stretching your arms overhead or bending them and sliding your hands past your ears to hold the crate (Figure 2). In either case keep your elbows shoulder width apart: With this alignment, you'll properly direct the bending action to your thoracic spine, instead of arching by hyperextending your shoulders. Also, roll your top shoulderblades back toward the crate to open your chest even more.
Approach this higher bolster with the acute mindfulness you have honed by working with the lesser bolster. Do not sacrifice the pumping rhythm of your breath, as it will help you stay over the bolster longer and in more comfort. Stay as long as you feel you can continue to replace tension with space relaxation and expansion. To come off the bolster, slide your hips to the floor and lie back against your props. At this point your spine should feel warm, your breath steady, and your focus sharp. You're prepared to respond with sureness to the challenges that will arise in the upcoming backbends.
Our ultimate destination in this article is Dwi Pada Viparita Dandasana (Two-Legged Inverted Staff Pose), a daunting asana that requires suppleness in the spine and open shoulders. It is not a pose for beginners, and you may be thinking, "That's too advanced for me!" Even if you are right, let's see how far you can go. When I'm working toward an asana I know is near my limits, I approach it in stages. Hatha yoga is, after all, a journey that places unavoidable obstacles in your path. So what if you are only able to go part way toward your goal at first? Facing obstacles in your practice is not only inescapable; it is a crucial part of practice, and reveals lessons and insights even more important than the completed pose. If you practice with this attitude, you'll reap the most valuable benefits of practiceóand your asanas will probably change, too.
Dwi Pada Viparita Dandasana
Dwi Pada Viparita Dandasana
Before going further toward Dwi Pada Viparita Dandasana, you should be able to practice Urdhva Dhanurasana with straight arms and Sirsana I (Head Balance) without strain. If you meet these prerequisites, you're ready. Here we go!
Prepare as for Urdhva Dhanurasana: Lie on your back, feet on the floor, heels under the knees, and step your feet a little wider than your hips. Bend your arms and place your palms on the floor by your ears, fingertips facing the shoulders, and shoulder width apart. Pause for a moment to focus and tune in to your breathing. As you exhale, extend your calves and back thighs to pull your hips, shoulders, and head from the floor as you straighten your elbows. As before, rotate your upper shoulderblades toward your tailbone to lift your shoulders and lighten the load on your arms.
Since you probably won't be able to hold this asana for very long, corrective actions need to be done quickly and decisively. Bend your arms and place the crown of your head on the floor between your hands and feet, keeping your elbows shoulder width apart and directly over your wrists. To insure that your neck does not become compressed, exhale, press your hands into the floor, and again rotate your top shoulderblades toward your tailbone. Keep your chest open and lifted. On your next exhalation, bend one arm and slide your hand past your ear to cup the back of your head. Repeat the same action with the other arm, interlacing your fingers behind your head. (You may be more successful in these arm movements if you lift onto your tiptoes.)
With a powerful exhalation, press down through your elbows and lift your chest to raise your head off the floor. As your head lifts bring your heels down. Of course, your head may seem glued to the floor; if that's the case, continue to hold the pose where you are. If you do manage to lift your head the pose may actually become easier, since this movement allows your shoulders to extend. But be careful not to strain the shoulder joints by them pushing them beyond your elbows. Avoid this overextension by keeping your weight evenly distributed between your elbows and wrists, and by not allowing your elbows to drift more than shoulder width apart. It is absolutely fine to remain in this position, with your head raised and your feet directly below your knees. In the full pose, however, you move the feet away from the torso, plant your feet, and exhale as you stretch your calves and push to straighten the legs completely; then you place the crown of your head back on the floor inside the cup of your hands. Extend your elbows into the floor and rotate your top shoulderblades toward your tailbone to help your shoulders stay lifted. Your middle back will be asked to bend more deeply.
Now is the time to fully incorporate the inner quality you found during your time over the bolster. Don't lose your internal focus in the challenge of the moment. Do your best to maintain a steady breath rate. Use your breath, like a heart, to pump movement that reverberates through you, extending on your inhalation, opening on your exhalation, and softening hard edges to create a pose that is strong and peaceful.
Come out of this asana with great attention. First, walk your feet back under your knees. Continuing to balance on your head and lift your shoulders, return your palms to the floor next to your ears. Again check to make sure your hands are directly under your elbows. Push with your hands to lift the head, and tuck your chin and tailbone in as you roll your spine back down to the floor, tailbone touching last. Consciously slow your breathing down until you are once again at rest and can feel the powerful calm that is the product of balanced backbends.
Of course, such a dynamic pose as this will make you awareóperhaps painfully soóthat asking the body to be flexible and strong simultaneously is a tall order. Difficult as these demands may be, they present an opportunity to maintain an asana using the skills of introspection, breathing, and surrenderóskills that eventually transform a pose from an impossibility or an exercise in brute strength into a lucid, precise, poised asana. Practicing with this focus leads to sthira sukkha (steady comfort, Patanjali's definition of asana), a state in which the fluctuations of the mind have stilled and one finds a state of immense clarity that shines forth from the within. 25-45 word bio needed, preferably one we can use all year.
Barbara Benagh has been practicing yoga since 1974. She is grateful to her first teacher, Elizabeth Keeble of Birmingham, England, for igniting her passion for yoga. Barbara teaches seminars throughout the United States and has a particular fondness for her school, The Yoga Studio, in Boston, and for the devoted students there.