Benefits
• Tones abdominal organs and kidneys
• Stretches legs and spine
• Calms the nerves
• Quiets the mind
Contraindications
• Lumber disc injuries
• Sacrolliac strain
• Acute depression
• If pregnant, position legs wider apart
Intro
Intro
As yogis, we have learned that a disciplined practice yields positive results. We've also learned that we can usually produce specific results by doing certain poses or practicing a particular method. Some asanas will help an aching back, others relieve depression; one method builds strength, another is meditative; and so on. Since such benefits are both real and often predictable, you can be lulled into believing that the results are guaranteed, that you can "take" poses like a pill. Such a simplistic approach trivializes yoga and inevitably leads to disappointment and confusion, partly because it disregards the influence of individual variables like constitution and personality, but especially because it disregards the continuous fluctuations of each human mind.
Demonstrations
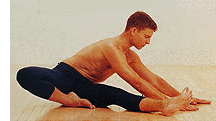
1. Hip Opener 1:
Janu Sirsasana Variation
Stretch your left leg forward and bend the right, planting the sole of the foot against the inside of the left thigh. Roll onto the outside of your left leg, raising the right hip and leg off the floor. Put your hands on the floor to the outside of your left leg with the right hand ahead of the left. Let your lower abdomen slide toward the left hip joint, softening resistance in your hip and rolling the abdomen further with each exhalation. Stay as long as you are progressing, then repeat on the other side.
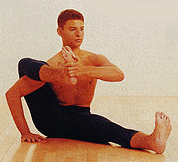
2. Hip Opener 2:
Leg-over-Arm Pose
Sit erect, with both legs stretched out in front of you. Raise your right leg, bend the knee, and reach your right arm on the inside of the leg to hold your calf. Next, grasp your right foot with your left hand, exhaling and relaxing your spine as you raise the leg higher. Work your upper right arm under your knee as close to the shoulder as possible and place that hand on the floor. Press your right arm into the right leg while simultaneously relaxing your hips and lower back. Continue to relax into this pose for a minute or two before repeating on the other side.
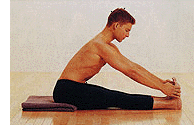
3. Easing Forward
Sit erect, with both legs stretched out in front of you and lean forward by rotating your pelvis over your legs. Hold your outer feet with your hands without rounding your back. If this isn't possible, place a folded blanket under your tailbone and slightly bend your knees. If your back still rounds excessively, hold a strap looped around your feet. Relax your upper thighs, lifting and extending your torso away from your pelvis. Hold the pose and try to relax until the pose feels comfortable and easy.
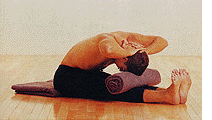
4. Bolstering Your Practice
From the previous position, deepen your forward bend. Move from your hips, keeping your head at shoulder level in line with your spine. Relax and breathe steadily to melt your pelvis over your leg bones nestling your abdomen into your inner thighs. A blanket roll under you head (or a bolster under your torso, if you're less flexible) can help you release. To free your upper back, cup your hands behind your head, pressing your head up and spreading your elbows. After a few breaths, release elbows, chest, and head back toward the floor, grasp your feet again, and continue to settle into the pose.
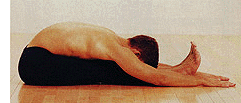
5. Paschimottanasana
As your pose deepens (perhaps over years), remove your props and rest your abdomen, chest, and head on your legs. Continue to grip your feet while softening your upper thighs and releasing tension from your hip and back muscles. When you feel completely at ease, relax your arms onto the floor. Maintaining a steady focus on your breathing and making as little muscular effort as possible, hold the pose as long as you wish.
Different Strokes
Different Strokes
The influence of mind can be observed throughout your practice, but forward bends, particularly prolonged forward bends, are especially fertile ground for cultivating the understanding that yoga must involve so much more than physical effort. The simplicity and symmetry of Paschimottanasana (Seated Forward Bend) makes it an ideal asana in which to examine the ebb and flow of the mind.
Paschimottanasana is also called Stretch of the West, a name I prefer because it poetically evokes the ancient ritual of yogis facing the sunrise as they practiced. (Paschima means "West" in Sanskrit, and the yogis were literally stretching the west side of the body as they bent toward the sun). Like other forward bends, Paschimottanasana, when practiced appropriately, provides practical physical benefits. Most obviously, forward bends stretch the muscles of the lower spine, pelvis, and legs. In addition, the upper back, kidneys, and adrenal glands are stretched and stimulated, thus making Paschimottanasana a potentially therapeutic pose for those with respiratory or kidney problems as well as for those who suffer from adrenal exhaustion. When a student's pose has progressed to the point where the torso rests on the legs, the pose provides added benefits: a massage to the abdominal organs and a profound calming effect.
While this information may motivate you to practice Seated Forward Bend, alas it makes the pose no easier. Quite simply, forward bends are a struggle for most of us. Many of the things we do for fitness, such as running and weight training, make us strong at the expense of flexibility. Sitting at a desk all day doesn't help, either. Therefore, if you're a stiff or more beginning student, I suggest you introduce forward bends during the latter part of a practice, when your body is thoroughly warm. This advice goes double if you have lower back troubles.
Having said this, let me note that I now actually like to do Paschimottanasana near the beginning of my practice. Starting close to the floor can be deeply grounding. Also, warming up by attention to "undoing" tight muscles, instead of by a lot of movement, can set a deep, introspective tone that persists throughout your practice. But I recommend you try this approach only if you are flexible enough to bring your torso close to your legs without effort. I'll make a confession. This forward bend has been a difficult pose for me. I have empathy for your struggle, but I can testify that Paschimottanasana's benefits are well worth the effort. Many times I have seen other students resting on their legs, seemingly at ease, and longed for their experience. This asana has taught me much about humility, strategy, and surrender. Only in recent years has my experience been what I imagined it could be: deep inner focus and peace. Unless you're already extremely flexible, my advice is to begin this pose with little thought of bending all the way to your legs. Paschimottanasana, for most yogis, is achieved slowly and with great patience.
Prepare the Ground
Prepare the Ground
There are a number of poses that can physically prepare you for Paschimottanasana. They include Supta Baddha Konasana (Reclining Bound Angle Pose), for the deep abdominal and inner hip release it provides; Uttanasana (Standing Forward Bend), in which your spine is lengthened by the pull of gravity; Supta Padangusthasana (Reclining Big Toe Pose), an effective hip opener and hamstring stretch; and Padmasana (Lotus Pose), which releases holding in the upper thigh.
Three hip openers, in particular, can dramatically improve Paschimottanasana. The first is Balasana (Child's Pose); by resting your torso on your thighs, this simple pose gives you a taste of the sensation of ease and calm that can saturate the body in a deep forward bend. The second is a variation of Janu Sirsasana (Head to Knee Pose), and the last I call "Leg over Shoulder." Let's look in depth at these last two.
To prepare for this variation of Janu Sirsasana, sit upright with the soles of your feet together and knees apart in Baddha Konasana (Bound Angle Pose). If you cannot sit with your pelvis at a right angle to your legs and your spine straight, I suggest you place a folded blanket under your hips buttocks to make it easier to rotate the pelvis forward. Exhale and straighten your left leg on the floor in front of you. Roll to the outside of your left hip and leg, letting your right knee and hip lift off the floor. Place your hands on the floor to the outside of your left leg and far enough forward so their position contributes to the forward bend (Figure 1). If you are particularly flexible, try bending your right elbow and bracing it against the outside of your lower left leg for a more challenging stretch.
By leaning to the right, you are using gravity to your advantage: Your abdomen relaxes toward the right hip, centering your torso over your right leg and thus creating a slight rotation of the spine that gently stretches the lower back. Help make your hip more receptive by relaxing the groin deeply with each exhalation. Don't be afraid to let go. Gradually, your hip joint will open and you may feel a slight stretch across the sacrum as your spine moves to the right. The deep penetration into your hip joint will increase as you linger and your ability to soften and dissolve muscular resistance increases. You can further enhance the effect by imagining the abdomen spinning clockwise, like a wheel, into the hip. Paschimottanasana benefits greatly from this asana, which targets the hip for intensive opening and also gently reduces the lower back tightness that can restrict the forward bend. When you are ready, come out of the pose and repeat it on the left side.
Another very effective preparatory pose involves draping your leg over the back of your shoulder or upper arm. This hip opening action is part of several asanas, including Kurmasana (Tortoise Pose) and Eka Hasta Bhujasana (One Leg Over Arm Pose). Be careful, though, because it stretches the sacral and lumbar areas and can exacerbate strain if your lower back is sensitive. Eventually, this deep stretch can be quite therapeutic-but don't rush it.
Sit on the floor or on a folded blanket, as in Janu Sirsasana, and stretch your legs straight in front of you. Raise your right leg, bend the knee, and reach your right arm along the inside of the right leg to hold your calf. Now for the fun part: Breathe in and lean back slightly, then exhale as you push your right leg back and place it over your shoulder or upper arm. (You want the back of your knee to rest as close to the shoulder as possible.)
Pause to collect yourself. Put your right hand on the floor and gently press your arm out into your leg to deepen the hip opening. At the same time, use your left hand on the sole of your right foot to draw the leg farther back and open the hip even more (Figure 2).
The position of your leg on the shoulder requires that your back be able to round. Indeed, the stretch the back muscles receive helps you to create the fluid spine needed for Paschimottanasana. But avoid overrounding your back: Keep your chest broad and make sure you are able to maintain a steady rhythm in your breathing. This is not the time to be aggressive. Hold this pose but a few breaths if you find it extremely difficult. Several short repetitions are better than straining to prolong the position. Don't worry: You'll still notice the work on your hip when you move on to Paschimotanasana. When you're ready, release the pose and repeat on the other side.
A Delicate Balance
A Delicate Balance or Balancing on the Edge
Now that you have warmed up by practicing preparatory asanas, you're ready for Paschimottanasana. Begin in Dandasana (Staff Pose), sitting on the floor with your legs stretched straight out in front of you. Position your pelvis at a right angle to your legs and vertically extend your spine. Again, if you cannot do this, elevate your hips with a folded blanket under your buttocks. If you are fairly flexible keep your feet together; if not, place them hip-width apart. Either way your legs should be parallel, so your knees face up, and your feet and legs should be active. I have noticed that sometimes when I direct a student to be more active in their legs, they completely stiffen the legs, particularly the feet and upper thighs. But you should only engage your leg muscles enough to maintain the alignment and extension of the limb. Mistaking overeffort for vitality will just restrict you more.
Explore the difference for yourself. Roll your legs in and out a few times, beginning the movement in your hips. This movement alone can ease some of your muscular tension. Then just let your legs relax. With your thumb gently probe the area where your leg joins the hip. Along the outer top thigh you will probably feel the tendon of one of the quadriceps muscles: It's kind of ropy. Keep pressing the area as you tighten your leg. If you couldn't feel the tendon before, you will now, because it will harden and pop up. Relax your leg again. Now, very slowly, extend the back of your leg, turning both legs so they are parallel and the kneecaps point straight up, while trying to keep the quadriceps tendon soft. Of course, it will display some action, but I want you to recognize the difference between using and overusing your quadriceps. Continue to play with this balance until you can dynamically extend each leg using minimal effort. Using less effort lets the upper thighs lift without tightening, liberates the hamstrings, and allows space in the hips, thus making the coming forward bend easier.
Now let's work on the actions of the feet. Begin by noticing their first cousins, your hands. Open your hands, feeling the stretch as the palm widens and your fingers spread. Replicate these movements in the feet, widening the instep and separating the balls of your toes. Extend forward evenly with all five toe joints and with the center of your heels. As with the leg action, seek a dynamic, attentive movement that isn't tense.
Continue these actions in your legs and feet and exhale as you ground your thighbones, rotate your pelvis forward, and hold the outer arches of your feet. Holding your feet is an anchor that may help you release muscle tension, but don't pull yourself over your legs with your arms; this may strain your back. Retain the quietness in your upper thighs so your pelvis will more easily glide over the head of the femur. Keep your chest softly open, your head in line with your spine, and your neck soft and long (Figure 3). Most importantly, maintain fluid length in your spine.
When we practice forward bends, our backs are strongly stretched. Like Goldilocks, finding what is "just right" can be a challenge. If you hold your back too straight, you may develop habits that make your spine rigid. But if you round your spine too much, you compress your chest, put stress on the lumbar ligaments, and retard the forward rotation of the pelvis. A well-integrated spine barely curves, like a lens, rising gently and comfortably from the pelvis. To accomplish this "just right" spinal alignment, you may need to change your grip and hold your ankles or a strap looped around your feet. You may even have to bend your knees slightly. And every so often I encounter a student who, because of injury or extreme inflexibility, simply cannot approach this pose. For them, I suggest lying on the back with the legs up the wall, letting the hip joint open passively. Always remember that the integrity of your spine is of primary importance.
Once you have found a position that suits you, close your eyes and turn your attention inward as you begin to refine and deepen the asana. In our concern about the mechanical details, it's easy to overlook the internal environment of mind and breath. Your breath is a reliable guide as your progress in Paschimottonasana becomes more subtle. As your forward bend evolves, your exhalation should naturally lengthen. If it doesn't, you're forcing the pose.
As the difficulty of the pose increases, you may become so disappointed or frustrated that you are just going through the motions, no longer fully present. Or you may become so focused on getting your torso onto your legs that you miss the nuances of the process. With practice, you will realize your body has its own timetable, the pace at which it can change and grow. By following the pulse of your breath, you respect your innate process, develop insight, and, eventually, deepen your pose.
Staying in touch with your breathing, recall the quality of deep hip opening that you felt in Janu Sirsasana. As you did then, use an exhalation to coax space for your lower abdomen in your inner hips. At the same time, keep your upper thighs rooted and your spine neutral. Because of the angle of your torso, gravity is your ally once again. As your pelvis is freed, gravity will eventually pull your torso and head to your legs, allowing them to rest there.
Bolstering Your Practice
Bolstering Your Practice
Please appreciate that I am describing a lengthy process! The changes I just outlined may take years. You will most likely encounter many boundaries where your resistance temporarily slows you down.
Supporting your torso on a blanket roll or bolster is one way to ease yourself through those obstacles. The key to using a bolster well is to position it so you can fully release your weight into it. Where you position your bolster depends on how deep your existing forward bend already is. If you are only a few inches from your legs, place a blanket roll or bolster under your forehead. If you can't get so close to your legs, place the bolster under your chest or abdomen, and let your body fall into its support.
Here again, the mind can intrude, resisting the surrender that is required to fully benefit from bolster work. Explore the mental patterns you're bringing to the asana-an urge to push or a tendency to give up and space out-and redirect your attention to the sensations of letting go. As you deepen your pose by doing less, you may recognize how emotions stored in the body can mimic physical inflexibility-and your pose will most likely begin to move.
Here is another technique to help free your spine. Still resting on the bolster, cup the back of your head in your hands. Drop your elbows toward the floor and let your upper back spread. Then keep your shoulder blades wide as you exhale and raise your elbows, stretching them away from your sides. Press the back of your head into your hands as you open your chest and lengthen your torso forward (Figure 4). Expand this motion for several breaths and then release your elbows, chest, and head down again. You may find your forward bend to be both deeper and more extended. If you are supple enough to lay your whole torso on your legs, remove the bolster (Figure 5); otherwise, keep it in place.
As your pose grows quieter, supported by either a bolster or your legs, stay in touch with the form of the pose by sending delicate physical reminders to yourself whenever you feel the discomfort of misalignment disturbing your inner focus. Gently root your tailbone to earth. This action is not a tuck, since that movement will restrict the free rotation of your pelvis. Rooting your tailbone is really little more than keeping an awareness of your base and maintaining the idea that your tailbone is heavy. Keep your feet and legs active, as you have already practiced. Continue to deepen the sensation that your torso is at rest on your legs or the bolster, allowing your belly to feel liquid and cool. Let distractions diminish until they blur into the background and you find yourself immersed in the inner terrain of the pose.
Sustaining this inner focus is a challenge similar to what you might face in any style of meditation. The pose itself is a source of both inspiration and struggle as you dance between effort and surrender, between attention and distraction. As you become more successful at overcoming your physical impediments, the influence of your mind becomes more and more obvious. For example, you may be surprised by your resistance to prolonging the pose, particularly if you are quite flexible but not accustomed to long holds. Or maybe you're a "technician," fussing with your pose too much, unable to relinquish control and just be present. Are you at the mercy of nervous energy, itching to get on the move and into the next pose? At this point, whatever your tendencies, the mental challenges you encounter are the most likely threats to deepening your practice. Pride, expectation, and a host of other emotions will pass across the screen of your attention-a veritable analyst's couch of behavior for your consideration. And you thought this was just a hamstring stretch!
Inevitably, as you deepen your pose you'll encounter struggles that create agitation and sabotage a balanced, sattvic experience. Is laziness (tamas) trying to talk you out of persevering? Conversely, are you determined to stay no matter what even though your whole being is begging for relief? Look to the inner rhythm of your breath for guidance. It can help you know whether the urge to stop arises from truth or your same old propaganda; it can help you find a second wind that calms your agitation and refocuses your mind; it can help you recognize when staying in the pose is overly rajasic and punitive. If you can recognize the balancing act of asana as the dance it is, you can benefit from each insight that accompanies the process. With time and practice, Paschimottanasana can deepen into a prolonged, body-oriented meditation.
Erich Fromm, the 20th century social philosopher, observed that we are made anxious by freedom and that many of us prefer restriction to facing ambiguity. We encounter just such a challenge in Paschimottanasana. We want to find a formula that controls the process and guarantees success. Instead we are forced to deal with our attachments and habits, amending them or letting them go. By being consciously attentive to the ebb and flow of thoughts and sensations, you begin to understand that the mind can, and does, constantly influence your yoga. And you learn that the asana itself is not only a vehicle for physical restoration and wellbeing, but also an effective tool for developing the psychological hardiness that grows from self-reflection.
Barbara Benagh has been practicing yoga since 1974. She is grateful to her first teacher, Elizabeth Keeble of Birmingham, England, for igniting her passion for yoga. Barbara teaches seminars throughout the United States and has a particular fondness for her school, The Yoga Studio, in Boston, and for the devoted students there.