Benefits
• Strengthens upper body, arms, and wrists
• Tones abdominal organs and muscles
• Improves concentration and coordination
Contraindications
• Carpal tunnel syndrome and similar repetitive stress injuries
• Acute sacro-lumbar strain
• Hernia
• Pregnancy
Intro
Intro
I love arm balances. They have an invigorating electricity despite, or perhaps because of, the fact that they are such demanding asanas. Arm balances are also marvelous equalizers. They come easily for almost no one. Most yogis shine at something: Some are naturally strong, some flexible, while others seem born to backbend. But very few easily acquire all the skills needed for arm balances: coordination, strength, and that mysterious gift of knowing just where the body is in time and space. Most of us must practice for years to develop precision in arm balances.
Arm balances include a variety of poses, including Pincha Mayurasana (Forearm Balance), Vrschikasana (Scorpion Pose), and single-armed balances like Vasisthasana (Pose Dedicated to the Sage Vasistha, also sometimes called Side Plank). However, in most arm balances the body is balanced in a variety of difficult positions while perched atop straight arms.
One such asana is Tittibasana (Firefly Pose). It is an advanced posture that, when expressed fully, requires tremendous flexibility, strength, and concentration. (It's also visually stunning.) At first glance this asana may appear daunting or even impossible. However, as with other advanced poses, you can make progress toward Tittibhasana by learning and practicing less challenging asanas that include similar actions and movements. After all, our bodies really only engage in a few kinds of basic movements. We can bend forward or backward, left or right, or we can rotate around our core. All asanas consist of different variations on these basic themes. As your yoga practice deepens, more difficult poses require you to express these basic movements more deeply or in combination. Sometimes the practice also challenges you by asking you to turn upside down or find a difficult balance. Still, if you analyze even the most complex poses, you can always find the same familiar movements. Knowing this may not make difficult asanas easier, but it can de-mystify them and help you realize that a regular, well-rounded practice will lay the foundation of endurance, increased range of motion, and concentration that leads to greater expertise (and, perhaps, more advanced poses).
Demonstrations
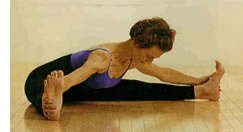
1. Upavistha Konasana
Sit with your legs wide apart (the outsides of the thighs should make about a 90 degree angle) and your weight centered on a line running down the back of the thighs, calves, and heels. Place your hands on the floor in front of you, keeping your head at the level of your shoulders. Release in your hip sockets and melt forward toward the floor. Do not drop your head or overround your back. As you release more deeply into the pose, reach out to hold the outer edges of your feet.
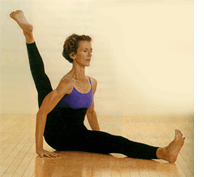
2. Eka Hasta Bhujasana Variation
Sit in Dandasana (with both legs stretched straight out in front of you). Raise your right leg, bending the knee and holding the foot with your left hand. Relax the muscles around your spine and hips and exhale as you raise the leg higher and hold the calf with your right hand. Work your upper right arm under your knee as close to the shoulder as possible and place your right hand on the floor. Press your arm into the back of the leg and again relax your hips and lower back. Exhale as you slowly straighten your leg as much as possible. Hold for several long, steady breaths before repeating on the other side.
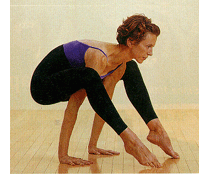
3. Dwi Hasta Bhujasana Preparation
Stand with your feet slightly wider than your hips and bend forward. Slide your right upper arm behind your right knee and hold your calf. Repeat on the other side. Gently squeeze your knees into your arms and place your hands, fingers facing forward, on the floor several inches behind your feet. If this places strain on your wrists, use a wedge or folded blanket under the heel of your hands. Exhaling, lift your hips and transfer your weight from your feet to your hands. Keep your head up and look forward. Hold this position just long enough to establish your balance, then advance to the next exercise.
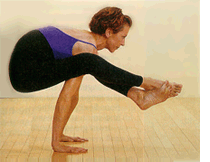
4. Dwi Hasta Bhujasana Variation
Begin in the previous position. Press your hands firmly into the floor and exhale as you lift your hips. Squeeze your knees toward each other as your lift your feet slightly off the floor and cross your ankles. With another exhalation, raise your hips and feet as high as possible, keeping them at the same level. Continue to look forward and breathe steadily, focusing on completing your exhalation. Hold for a few breaths before continuing to the next exercise.
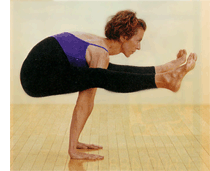
5. Tittibhasana
From the previous position, uncross your ankles while squeezing your arms with your inner legs. On an exhalation strongly extend your legs until the knees are as straight as possible. Don’t hang at the hips! Straighten your arms as much as you can, look straight ahead, and breathe steadily. Come out of the pose by bending the knees, placing the feet back on the floor, and standing.
The Launching Pad
The Launching Pad
There are a number of asanas that can specifically pave the way for Tittibhasana. Adho Mukha Svanasana (Downward Facing Dog), a staple in nearly everyone’s yoga practice, is great for developing the upper body and arm strength that you need for arm balances. For many of us, strength isn't the only challenge in Tittibhasana; poor flexibility in the hips and spine can present an even greater hurdle. Let’s look at several asanas that can help you to increase suppleness in these obstinate areas.
When we first learn forward bends, we often tend to incorrectly bend from the waist rather than correctly rotating the pelvis forward; we may not yet know any better, and the incorrect movement is certainly easier. Since continuing to bend that way will eventually weaken the lower back, teachers quite properly try to prevent damage by encouraging students to elongate the lumbar spine. Unfortunately, novices too often tighten their muscles along the spine as the attempt to draw it forward. In my opinion, this action is an over-correction that can result in the lower spine becoming habitually rigid and can also cause lower back strain in many asanas. A more appropriate is to engage your lower back muscles just enough to create a gentle toning that allows the spine space to safely adapt, whether is be lengthening, arching, twisting or, in the case of arm balances, rounding. A more appropriate action is a happy medium between under-and overworking the back muscles, a gentle toning that allows the spine freedom to safely adapt whether it is asked to lengthen, arch, twist, or, in the case of arm balances, to round.
A very simple yet potent asana to create more flexibility and awareness in rounding your spine is a variation of Balasana (Child’s Pose) in which the forehead is brought to the knees. Begin by sitting on your heels and bending forward to rest your forehead on the floor, keeping your arms at your sides. In this simple forward bend your breathing will slow down; the exhalation will naturally extend as your back muscles gently lengthen and widen. As your body settles into the pose, notice the rhythm of your breath in your back body and the sensation of movement your breath creates. Let the breath's gentle massage undo tension in the back muscles and help the spine lengthen toward the tailbone. This simple release is a powerful demonstration that movement can be generated as much by letting go as by effort. As your back relaxes, rest your abdomen on your thighs and let the femur bones sink toward the heels. This last movement anchors your weight at the base of the spine, counteracting the tendency to be top-heavy, focus awareness only in your head, and, thus, cut off from your belly. The belly must be alive and aware if you are to do arm balances well!
Still in Balasana, without lifting your chest off your legs, place your hands behind your head and pull your forehead as close to your knees as possible, exploring a deeper rounding of the back. Many yogis tend to bend their backs by rounding strongly in the upper spine while remaining stiff and dull in the lumbar region. If you keep your chest on your knees you really have no alternative but to wake up your lower back muscles. Certainly you shouldn’t force this rounding, but you should expect to feel a sensation of resistance in the muscles running along your spine and perhaps also in those running across your mid-back. Once again, use the rhythm of your breathing to help undo muscle tension throughout the back body. Also, consciously lengthen your whole spine. I like an image well-known yoga teacher Victor Van Kooten uses to evoke this action. Imagine that each vertebra from the skull to the tail is a sneaker, and let them walk, heel to toes, down your back. I think this image works well because it encourages a subtle awareness of each vertebra's independent movement.
As you remain in Balasana, accept the gentle rounding the pose encourages. Your lower back will gradually adapt, leaving you with a broad back and a sense that your abdominal organs expand back to fill and support your pelvis.
Fire in the Belly
Fire in the Belly
When you're ready, come out of Balasana, sit up, and extend your legs ahead of you. Spread them wide apart for Upavistha Konasana (Seated Angle Pose). Place your hands on the floor behind you for support as you position your pelvis at a right angle to the floor. If you have trouble achieving this, a folded blanket under your buttocks may help. Remain aware of your breathing rhythm, using each exhalation to help root your thigh bones to the floor. Soften your upper thigh, allowing it to move toward the hip joint, seating the femur head and freeing your hamstrings. Your weight should be centered on a line that runs down the backs of the thighs, the calves, and the heels. Elongate your legs and keep your feet active by extending the ball joints of your toes forward.
Once you can sit upright comfortably, move your hands to the floor in front of you. Keeping the thighs grounded, exhale to rotate your pelvis forward. Keep your front body long, your chest broad, and your neck long. At the same time, continue to root the thigh bones. This subtle action generates heat in the abdomen, a prelude to the intense abdominal action that helps you lift your pelvis off the floor in Tittibhasana.
Let’s explore this action more closely. As you sit in Upavistha Konasana, move your pubic bone down–away from your navel and back toward the tailbone–with each exhalation. At the same time, drop your tailbone to meet the pubis. These actions, when done correcty, will generate a distinct firming in your lower abdomen, but achieving the proper balance between these two actions is a sophisticated gesture that can take time and patience to learn. Yogis with tighter bodies will find the pubic bone movement difficult, while those with looser bodies may struggle with keeping the tailbone heavy. But learning to balance these actions is worth your attention and effort; it will result in very valuable internal support for your pelvis and spine.
When you have deepened your forward bend to your maximum, reach out and hold the outer edges of your feet (Figure 1). Now that your hands aren’t on floor, you really need the abdominal support we've been focusing on. Breathing with sufficient intensity will help you engage the marriage of the pubic bone and tailbone. Use the inner rhythm of your breath, especially the exhalation, to support this balanced action; feel your pelvis become light while your thighs remain rooted to the earth.
Even if you're flexible enough to reach the floor with your chest, you can increase the support in your pelvis more by keeping your torso suspended a few inches off the floor. Upavistha Konasana generates heat in the belly; you can amplify this energy by rotating your pelvis forward until you encounter resistance in your inner thighs and then shifting the heat of that resistance from the legs into your belly by intensifying the actions of your pubic bone and tailbone. You may almost feel as though your pelvis could take wing! You will not be able to sustain such intense action in these small muscles for long, so play with it briefly and then ease off to a level of effort that will allow you to stay in Upavistha Konasana for a longer time.
You may have to practice Upavistha Konasana for weeks, months, or even years before you have deep enough pelvic rotation to allow you to do Tittibhasana or its seated sister pose, Kurmasana (Tortoise Pose). Keep in mind that Upavistha Konasana is a wonderful asana in its own right in addition to its role in your journey toward Tittibhasana.
Another excellent stretch that can prepare your hips and lower back for Tittibhasana is a pose I call "Leg over Shoulder". Incidentally, it is also a good overture to forward bends, so you may also practice this exercise before doing Upavistha Konasana. Try it both ways.
Begin by sitting with your legs extended straight out in front of you in Dandasana. Raise your right leg, bend the knee, and hold your right foot with your left hand. Then reach your right arm inside the leg to hold your calf. Breathe in as you lean back slightly and exhale as you push your right leg back, placing it over your upper arm as close to the shoulder as possible.
Continue to hold your foot with your left hand as you put your right hand on the floor. Feel how the position of your leg on the arm requires your back to round. Take a few moments to focus on your back: Keeping your chest broad, consciously release the tight parts of your spine, just as you did in Child's Pose. Next, push your right arm against the leg as the knee hugs your back shoulder; feel how this action creates movement in your hip joint. The head of your femur will shift toward the outer hip and you may feel an internal rotation of the bone inside the joint. Generate a pumping rhythm by rotating your leg and pressing the knee into the shoulder as you exhale; decrease your effort slightly as you inhale. (Is this O.K.?) If you continue this conscientious coordination of breath and movement, you may feel your breath as a wave-like rhythm that helps you gradually deepen your pose without straining or losing your deep internal focus.
Maintaining the alignment of your right leg, exhale and place your left hand on the floor and begin slowly extending your right leg (Figure 2). Do not be surprised if your leg won’t straighten much at all, much less completely. Still, if you exhale and lengthen your leg consciously–if you’re willing to pause consciously often in your efforts, so you can assimilate the stretch–you may be able to progress significantly over the course of several minutes. Continue to rotate your femur, squeezing your knee in toward your the back of your shoulder so your leg doesn’t slide down the arm. Maintaining that action is more important than straightening your leg, since it both helps engage the ligamental plate that supports and protects the lumbar spine and generates heat in your belly.
Straightening your leg in this pose is a prelude to straightening your leg in Tittibhasana. You must be able to balance the effort of maintaining support in your abdomen (by merging your pubic and tail bones) with the surrender of softening the hip (so the leg can rotate in the hip joint and elongate). Hold the leg extended for several breaths; then come out of the pose and repeat it on the other side.
Leap of Faith
Leap of Faith
Now that you have warmed up your hips and back, you are ready to try to perch yourself on top of your arms. Like riding a bicycle (or any other activity that relies more on feeling equilibrium than on technique), balancing on your arms requires you to be totally present in your body. Part of your learning process must be a willingness to risk the tumbles that are nearly inevitable when practicing this asana.
When I practice poses in which I'm a little shaky, I remember a young friend of mine named Dylan. During one visit when he was six years old, Dylan was eager to show me that he had learned to do a flip. Over and over he ran down the lawn and jumped into the air, only to land in a heap on the grass. Each time he hopped up to try again. His faith was so enormous that he clearly did not consider his spills to be failures. Though he never turned a flip that day, I have no doubt that he eventually succeeded. As adults living in a particularly goal-oriented society, we often forget the enthusiasm of childhood and the sheer joy of movement. Don't be discouraged if you feel you do not yet possess the skills necessary to do Tittibasana. Instead, approach this arm balance with the spirit of a child.
First, you must establish a foundation position for your arms. Begin by standing in Tadasana with your feet a few inches wider than hip width. Lean over, bend your knees, and reach your right arm inside your right leg. Hold your calf as you place your right shoulder (or upper arm, if that's all you can manage) under the back of your knee. Continue to hold your right calf to maintain the position of your right arm as you repeat the procedure on your left side. As you practiced in Child's Pose, maintain awareness in your lower back by focusing on your breath and using it to mindfully relax any areas that are tight. As you practiced in Upavistha Konasana, generate internal support within your pelvis by drawing your pubic and tail bones toward each other.
Once you lock both upper arms in place, press them against your legs to hold their position. Place your hands, fingers facing forward, on the floor a few inches behind your heels, shoulder-width apart or slightly wider.
A safety note is necessary here. In Tittibhasana, your palms must be fully on the floor. This position requires that your wrists bend at a fairly acute angle. If you're currently suffering from carpal tunnel syndrome or other repetitive stress injury to the arms, I would advise against going further. But if your problem is simply inflexibility, this pose can be quite therapeutic. Until you can tolerate the full wrist action, feel free to lessen the angle by placing the edge of a folded blanket or a wedge under the heel of your palm. Another key to avoiding too much pressure on your wrists is to be active in our hands. Spread your fingers wide and vigorously press the balls of your fingers and your fingers themselves into the floor.
Liftoff!
Liftoff!
Once you're made any necessary adjustments to protect your wrists and forearms, there are two keys to successful transferring your weight: plan your move carefully and make it decisively. Several actions must take place simultaneously. You must activate your arms and grow your fingers into the floor; this action creates reliable support. You must make a strong effort to keep your shoulders over your fingertips, to keep your chest broad, and to generate heat and support in the lower abdomen by drawing your pubic and tail bones together. If your shoulders shift back or your hips drop, you will fall. And you must also press your knees into your shoulders so that your legs don't slide down your arms.
Focusing on all these actions, exhale strongly and shift your weight to your hands. Keep your toes on the floor and stare straight ahead (Figure 3). Congratulations! If you didn't fall over, you have established a secure base and are now ready to lift the legs and balance completely on your arms.
Maintain a steady breathing rhythm, making sure your exhalation is as long as your inhalation. Continuing to look forward, squeeze your upper arms with your legs and strongly extend your arms into the floor. On an exhalation, again engage your pubic and tail bones toward each other to firm your abdomen and support the lift of your hips. Maintain this lift as you raise your feet off the ground, crossing one over the other and pressing them together. With another strong exhalation, lift your feet and hips higher, keeping them level with each other (Figure 4).
This position is a variation of Dwi Hasta Bhujasana (Two Handed Legs over Arms Pose). It can help you get the hang of balancing, since it is somewhat less difficult than Tittibhasana. The strong action of pressing your feet against each other engages the legs and lifts your hips. (You said - seems like you should make clear what the leverage does. I thought I did describe the effect of the leverage, i.e. raising the hips but is this better?] Unfortunately, the crossed feet also make it possible to cheat by simply hanging the legs on the arms and letting the hips sag toward the ground. To do the pose properly and to use it to gain insight in Tittibhasana, you must pay attention to all the details we've already discussed. Take a couple of calm, strong breaths and firmly root your arms. Engage deep abdominal support by merging your pubis and tailbone. Squeeze your legs into your arms while internally rotating you upper thighs and softening in your hip joints. And keep your chest broad, while softly rounding and widening your back.
Since Dwi Hasta Bhujasana requires such strong action, hold it only a few breaths before uncrossing your feet, planting them back on the floor, and standing up into Tadasana. Check in with your back. Your consuming focus on Dwi Hasta Bhujasana may have drowned out distress signals from a lower back in trouble. If your lower back does ache, I would advise against any more arm balances today. Instead, gently hug your knees into your chest to allow you lower back muscles to gradually settle down. After your muscles have relaxed a bit you can also do a counterpose such as Setu Banda Sarvangasana (Bridge Pose) to firm and strengthen lumbar muscles that may have been weakened by over-stretching. If your back feels fine, however, you can proceed to Firefly Pose.
Perhaps the easiest way to enter Tittibhasana is to return to Dwi Hasta Bhujasana and use that pose to generate concentration and support before uncrossing the feet and straightening the legs into Tittibhasana. But let's try the slightly greater challenge of lifting directly into Tittibhasana.
Begin by again bending over and reaching your arms back between your legs to place your palms on the floor. Prepare for Tittibhasana, as you did earlier by positioning, and confidently transferring your weight from your feet to your hands. Since you know it is quite difficult to simultaneously lift your hips and maintain the flexibility to straighten your legs, pause to collect yourself and focus your attention on the actions you'll need for the pose. As you exhale, draw your pubis and tailbone toward each other, generating support within the bowl of your pelvis so your hips do not drop as you take strongly press your knees into your arms and lift the feet off the floor. Keep your knees bent for a moment and again consider your next move. Tittibhasana is a true exercise in balancing between effort and surrender. If you push too hard through the legs, you'll lose the internal rotation that keeps them hugging your arms. But without a strong lift in the lower abdomen, you’ll plop down on your derriere (if you use French, otherwise , bum.
Again gather together all the elements you need for a skillful demonstration of the asana. Engage the pubis and tailbone, broaden your chest, and look forward. Then, exhaling powerfully, extend your arms fully and, without allowing any other action to deteriorate, straighten your legs by extending the hamstrings, calves, and feet (Figure 5). When you engage all the necessary actions at once, you may find they merge a single clear intention that's sustained by the regular beat of your breath. You become a firefly with light aglow in your belly, expressing a universal human drive, played out from Icarus to the Wright Brothers to today's astronauts: the urge to fly.
Barbara Benagh has been practicing yoga since 1974. She is grateful to her first teacher, Elizabeth Keeble of Birmingham, England, for igniting her passion for yoga. Barbara teaches seminars throughout the United States and has a particular fondness for her school, The Yoga Studio, in Boston, and for the devoted students there.
Barbara Benagh has been practicing yoga since 1974. She is grateful to her first teacher, Elizabeth Keeble of Birmingham, England, for igniting her passion for yoga. Barbara teaches seminars throughout the United States and has a particular fondness for her school, The Yoga Studio, in Boston, and for the devoted students there.